Chromatic for Playwright
Chromatic’s visual tests integrate with Playwright by extending Playwright’s test and expect utilities. That means you can transform your existing Playwright end-to-end (E2E) tests into visual regression tests with a single import change. Start capturing interactive snapshots within your Playwright E2E tests, and review visual changes in Chromatic’s cloud environment.
Why visual test with Playwright?
Playwright enables you to write E2E tests that drive the browser to simulate and verify key user journeys like ‘sign up’ and ‘add to cart’. By snapshotting the UI states generated during your E2E tests, you can proactively catch visual bugs that might slip through traditional logic-based tests.
How does Chromatic work?
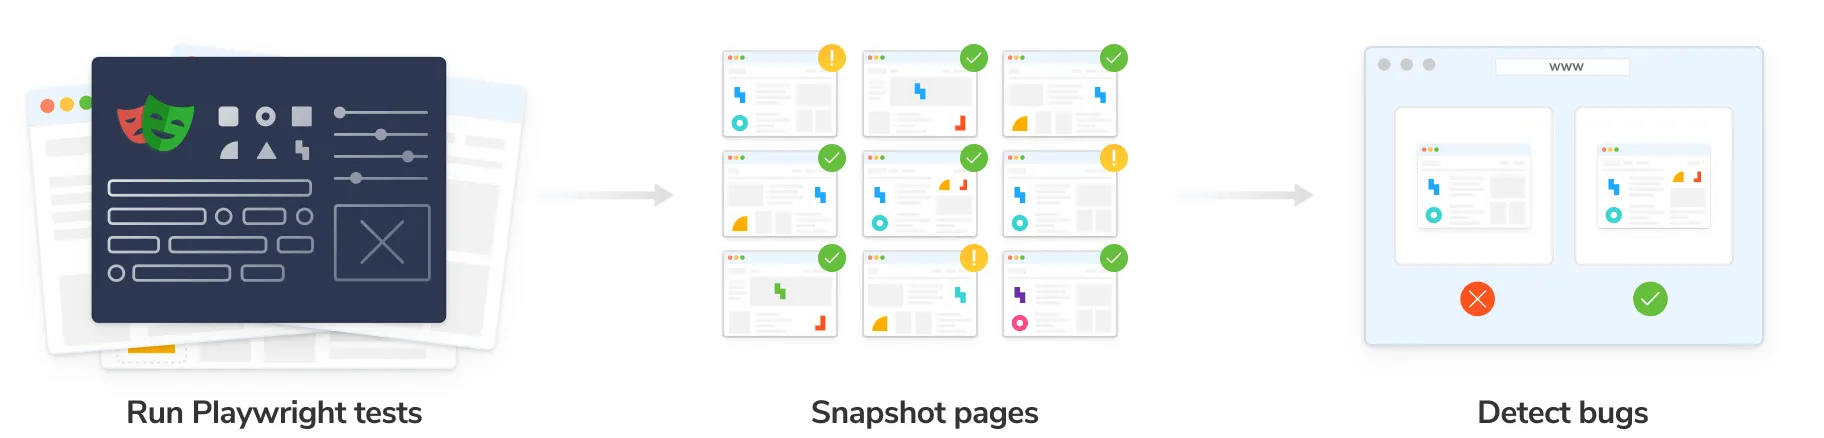
Chromatic works alongside your E2E tests. During your E2E test, Chromatic captures an archive of each page and uploads it to Chromatic’s cloud. There, Chromatic generates snapshots and performs pixel diffing to identify any unintended visual changes.
How does Chromatic’s visual testing differ from Playwright’s?
While Playwright offers a basic ability to capture and visually compare screenshots of UI. Chromatic’s difference is that it provides a significantly more robust and developer-friendly visual testing solution:
- Robustness: Chromatic captures full-page archives (including DOM, styling, and assets) of your test cases, which you can debug interactively in the Chromatic app, using browser dev tools. This eliminates the need to run further tests to troubleshoot errors.
- Workflow: Chromatic removes the need to manage snapshots locally in your repo. Chromatic’s snapshots are indexed automatically, linked to git commits, and stored in the cloud for easy access.
- Parallelized testing: Chromatic’s cloud infrastructure automatically scales to run all tests simultaneously, eliminating the need for you to configure multiple workers on your CI.
- Dedicated review app: Chromatic offers a suite of visual diffing tools to spot regressions fast. Features include unified and split diffs, highlighting ignored regions, spotlight mode to focus and zoom in on changes, and strobe diff to pinpoint subtle changes.
Setup Chromatic for Playwright
Chromatic supports Playwright version 1.38.0 and above.
1. Sign up and create a new project
Generate a unique project token for your app by signing in to Chromatic and creating a project. Sign in with your GitHub, GitLab, Bitbucket, or email.
If your repository already has a Chromatic project linked to it, you can create an additional Chromatic project to run visual tests with Playwright. Follow the instructions for sub-projects support.
How to setup Chromatic if you require SSO, on-premises, or have a different Git provider.
“Unlinked” projects are the way to go if you use an OAuth provider or Git host that Chromatic doesn’t support yet, or if you need an enterprise plan but wish to trial Chromatic with your project first.
To setup Chromatic with an “unlinked” project:
- Make sure your code is in a local or self-hosted repository (Chromatic uses Git history to track baselines).
- Sign in using your personal account via any of the supported providers. We’ll use this to authenticate you as a user only so the account doesn’t have to be associated with your work.
- Select “Create a project” and type your project name to create an unlinked project.
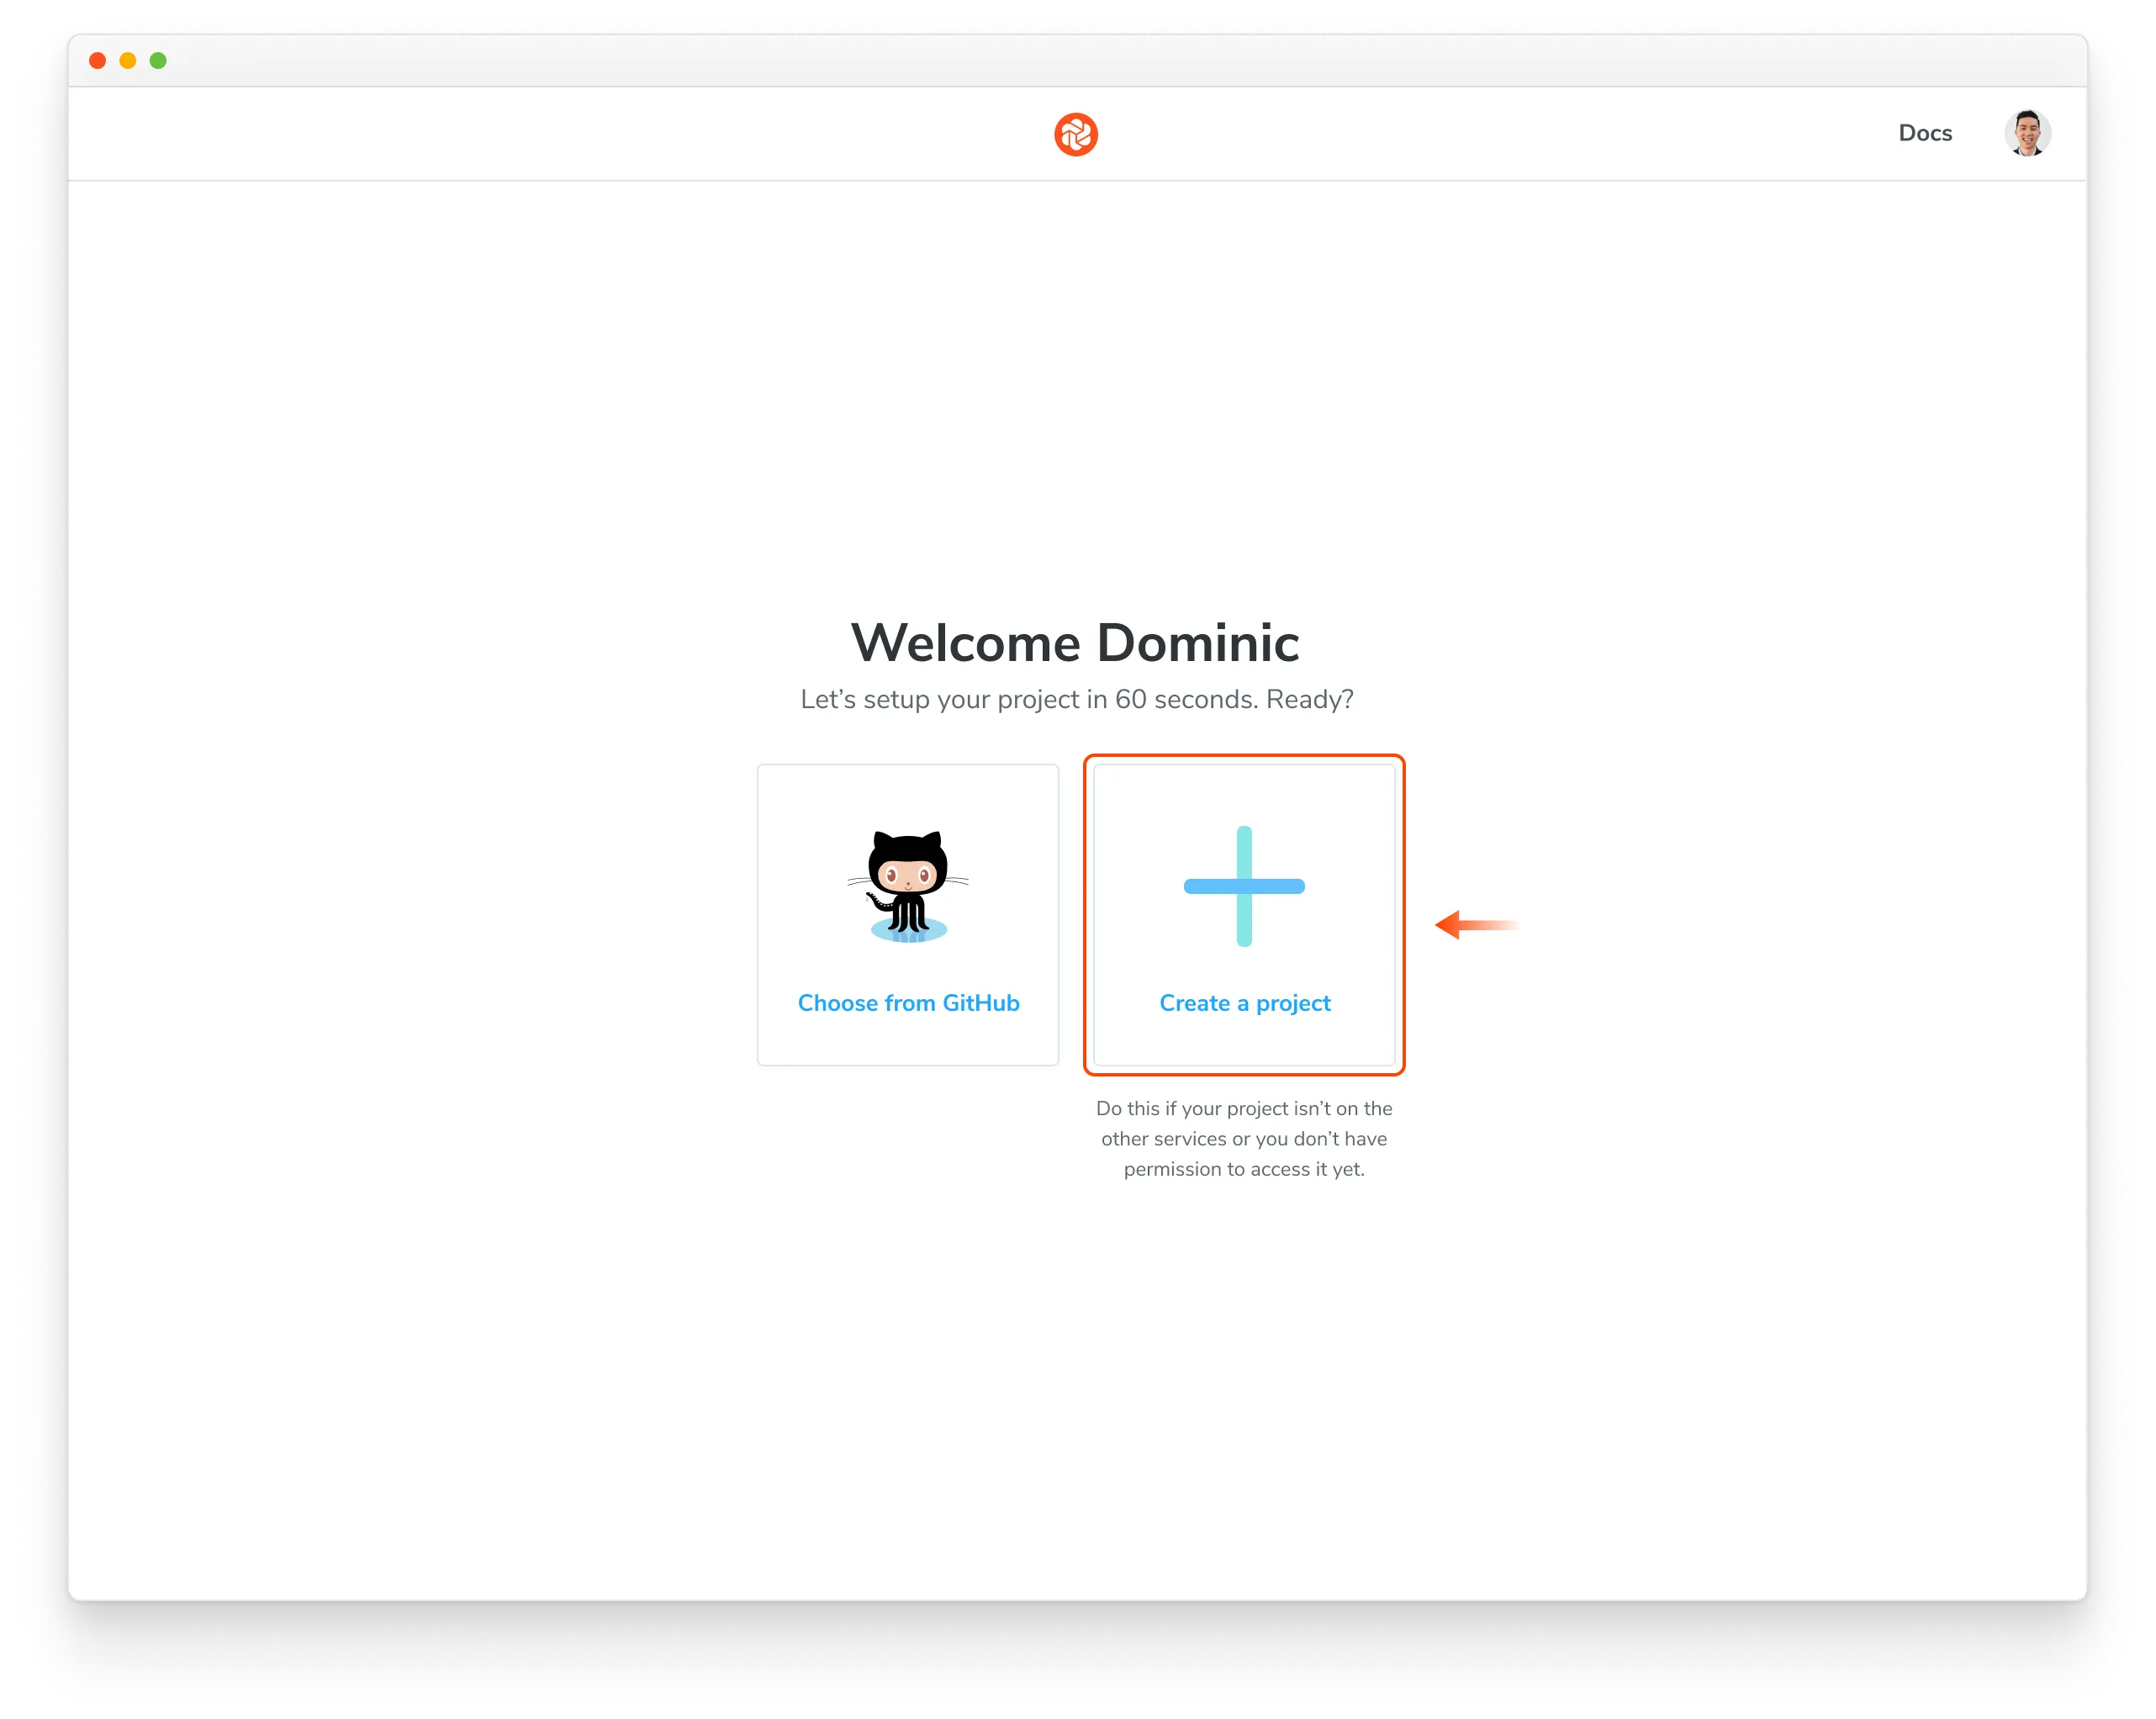
Nice! You created an unlinked project. This will allow you to get started with UI Testing workflow regardless of the underlying git provider. You can then configure your CI system to automatically run a Chromatic build on push.
The Chromatic CLI provides the option to generate a JUnit XML report of your build, which you can use to handle commit / pull request statuses yourself. For details, see the configuration reference options.
Unlinked projects have certain drawbacks:
- You won’t get automatic PR checks, so pull requests will not be marked with our status messages. You’ll need to set this up manually via your CI provider.
- Authentication and access control must be handled manually through user invites.
2. Install Chromatic
Install chromatic and @chromatic-com/playwright packages from npm.
$ npm install --save-dev chromatic @chromatic-com/playwright$ yarn add --dev chromatic @chromatic-com/playwright$ pnpm add --dev chromatic @chromatic-com/playwrightChromatic only works with tests written in Playwright v1.12+.
3. Add Chromatic to Playwright tests
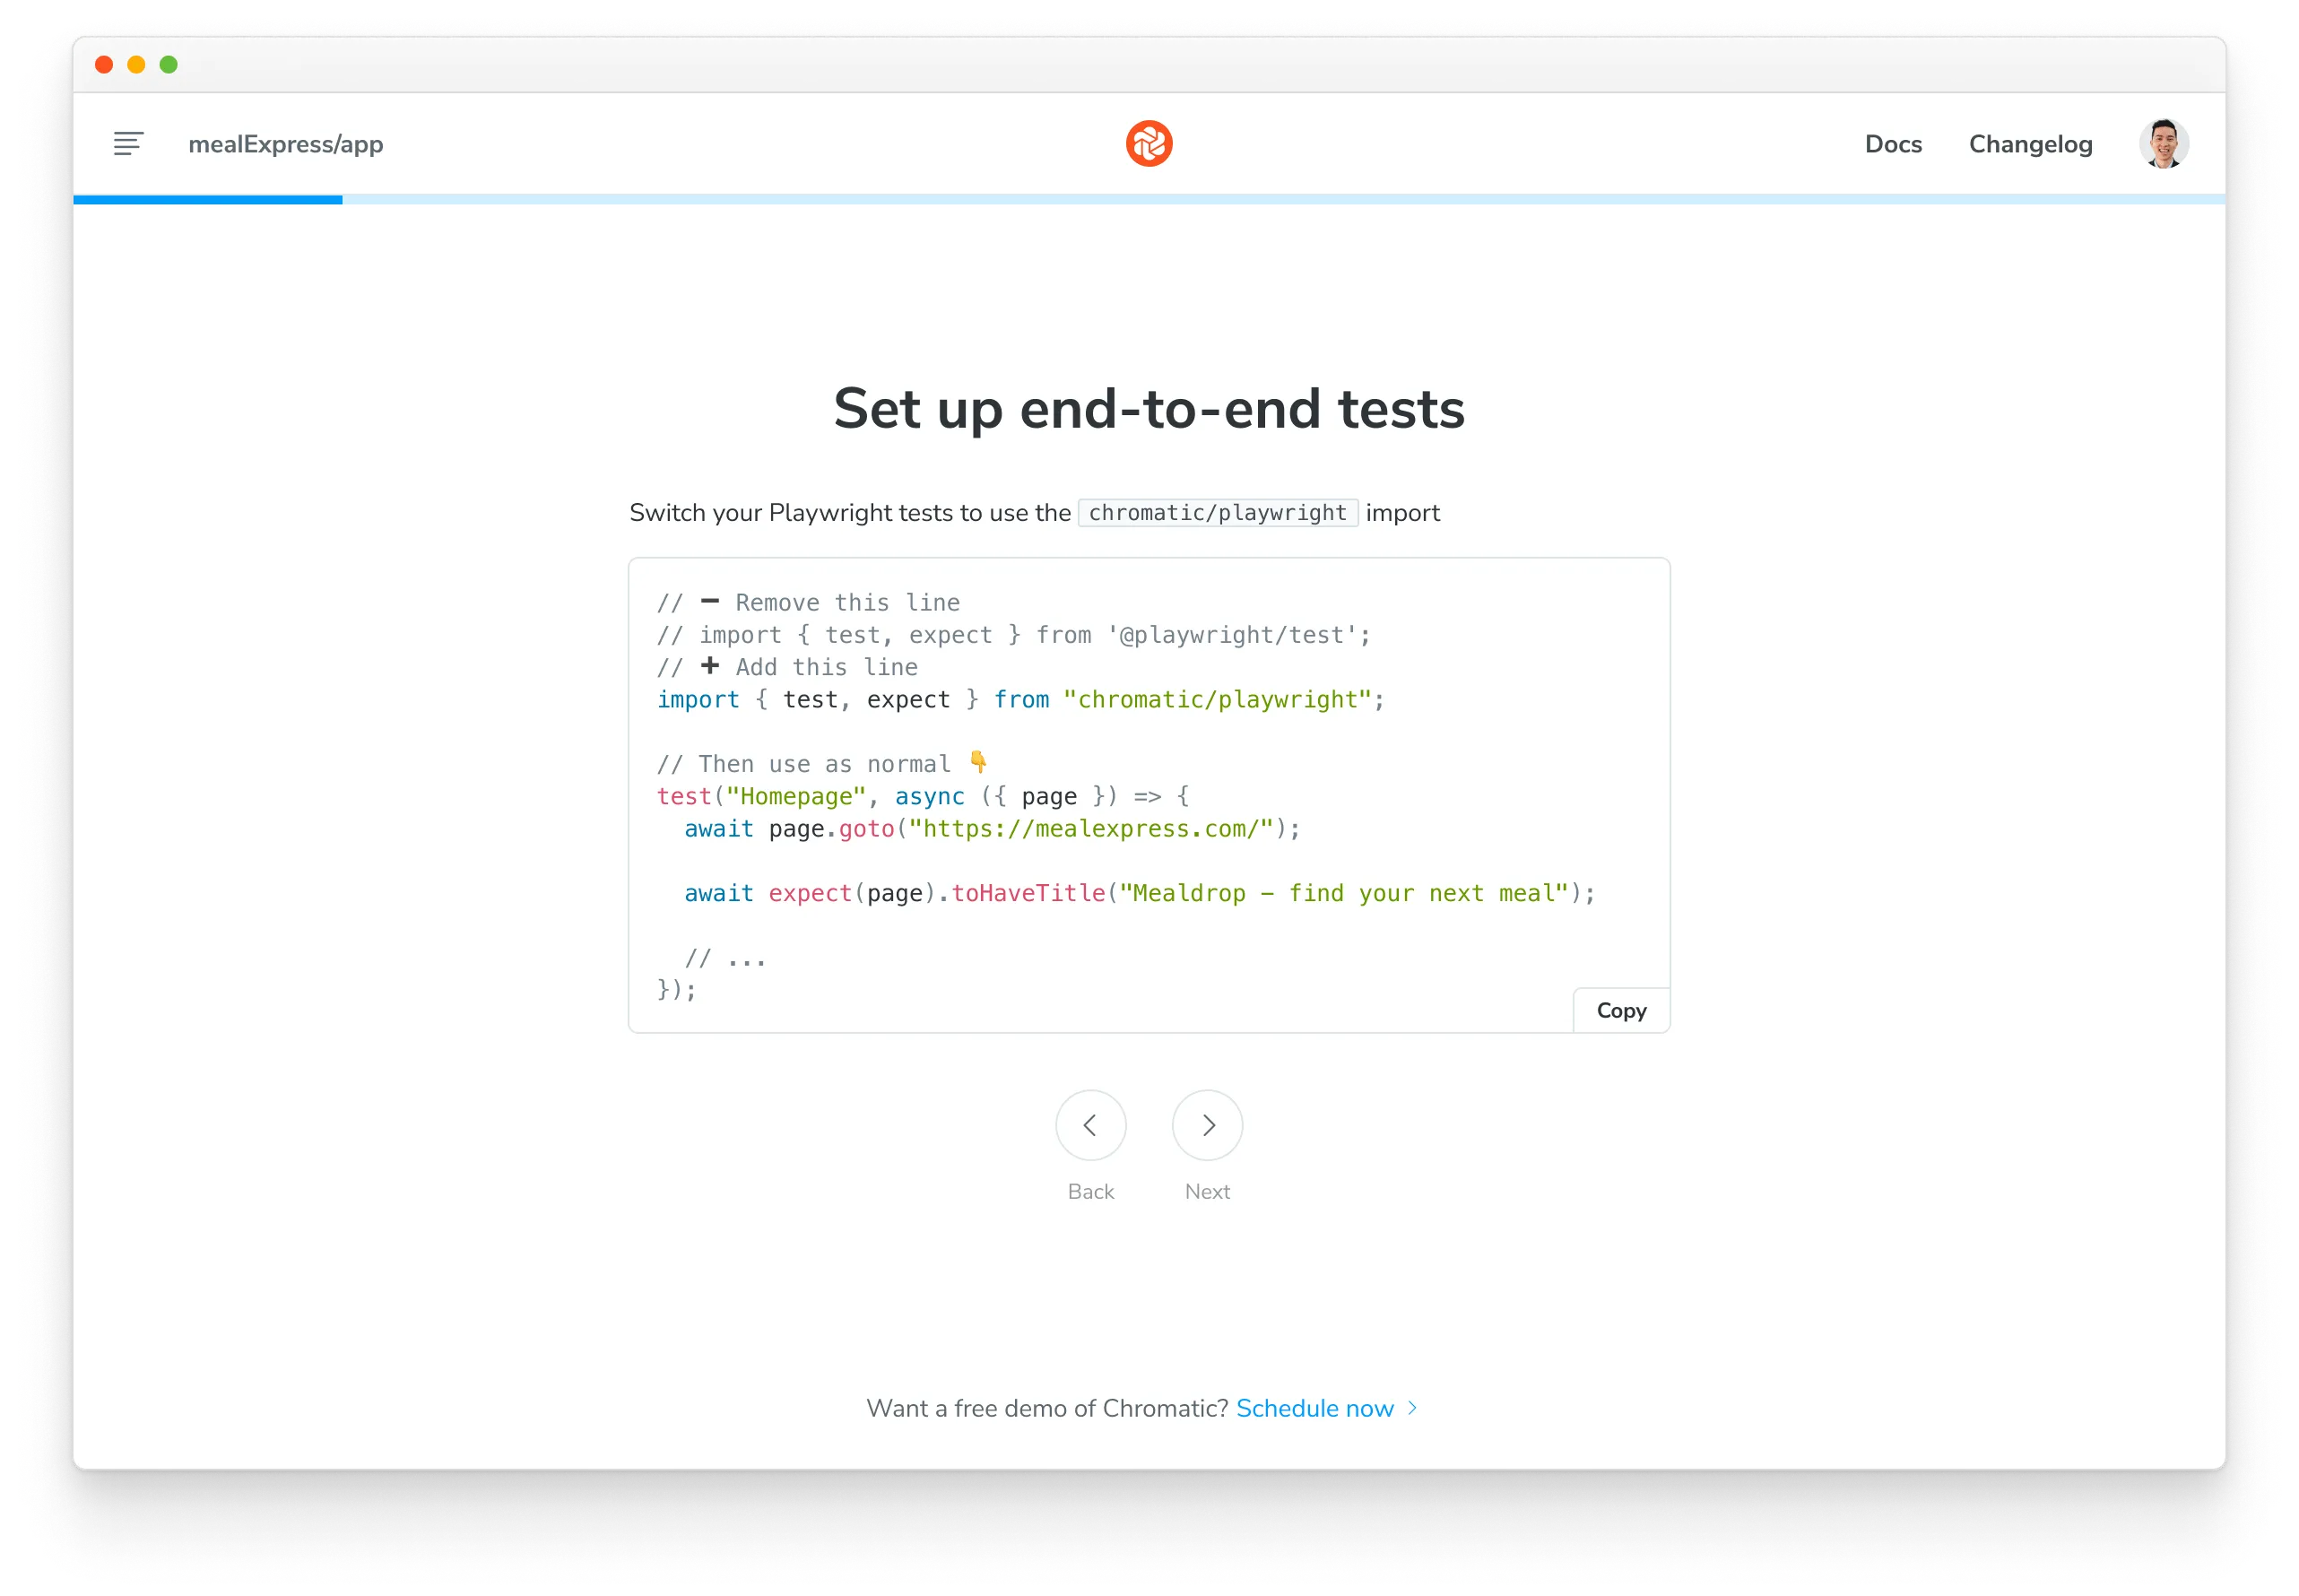
Update your Playwright tests to use the Chromatic specific testing utilities from @chromatic-com/playwright.
import { test, expect } from "@playwright/test";
import { test, expect } from "@chromatic-com/playwright";

// Then use as normal 👇
test("Homepage", async ({ page }) => {
  await page.goto("https://mealexpress.com/");

  await expect(page).toHaveTitle("Mealdrop - find your next meal");

  // ...
});
4. Run Playwright
Run your Playwright tests as you normally would.
While your Playwright tests are running, Chromatic captures an archive of your app’s UI for each test.
$ npx playwright test$ yarn playwright test$ pnpm playwright test5. Run Chromatic
Use your project token and run the following command in your project directory.
$ npx chromatic --playwright -t=<TOKEN>$ yarn chromatic --playwright -t=<TOKEN>$ pnpm chromatic --playwright -t=<TOKEN>When you execute the chromatic command, it uploads this archive to Chromatic’s cloud infrastructure to capture a snapshot of each test.
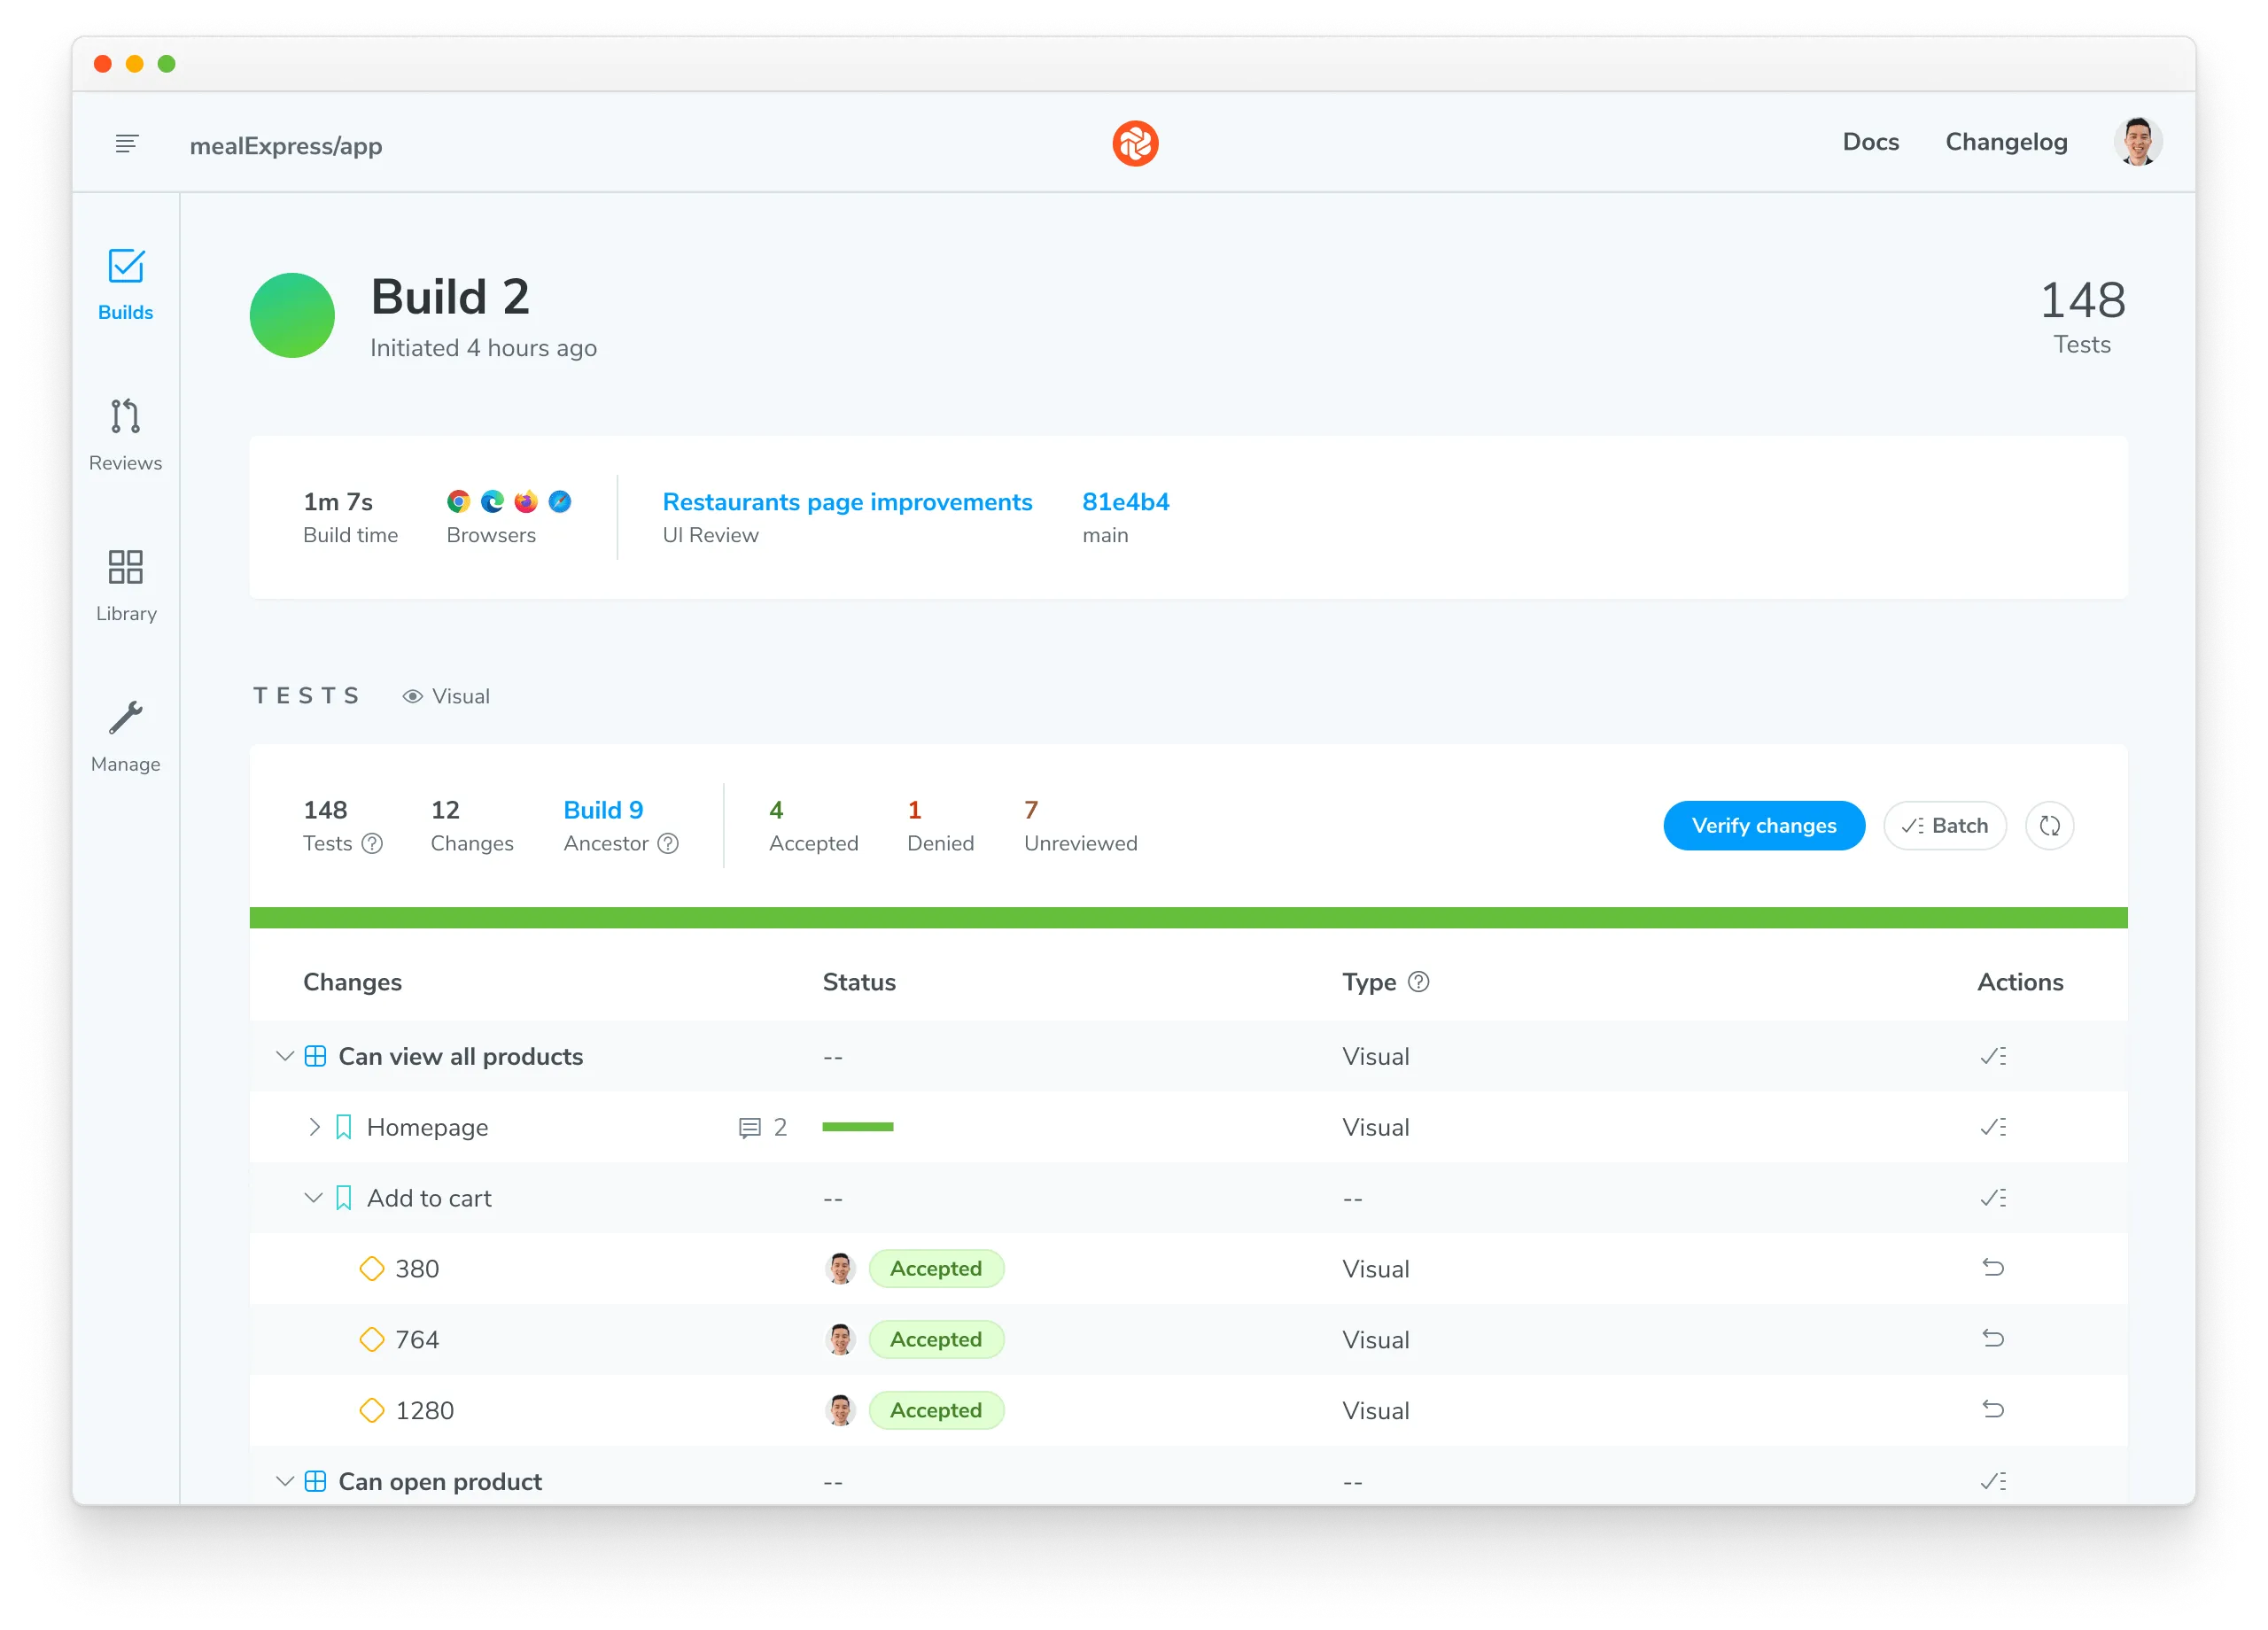
6. Review changes
When complete, you’ll see the build status and a link to review the changes. Click on that link to open Chromatic.
✔ Started build 1
  → Continue setup at https://www.chromatic.com/setup?appId=...
✔ Build 1 auto-accepted
  → Tested X stories across 10 components; captured 10 snapshots in 1 minute 3 seconds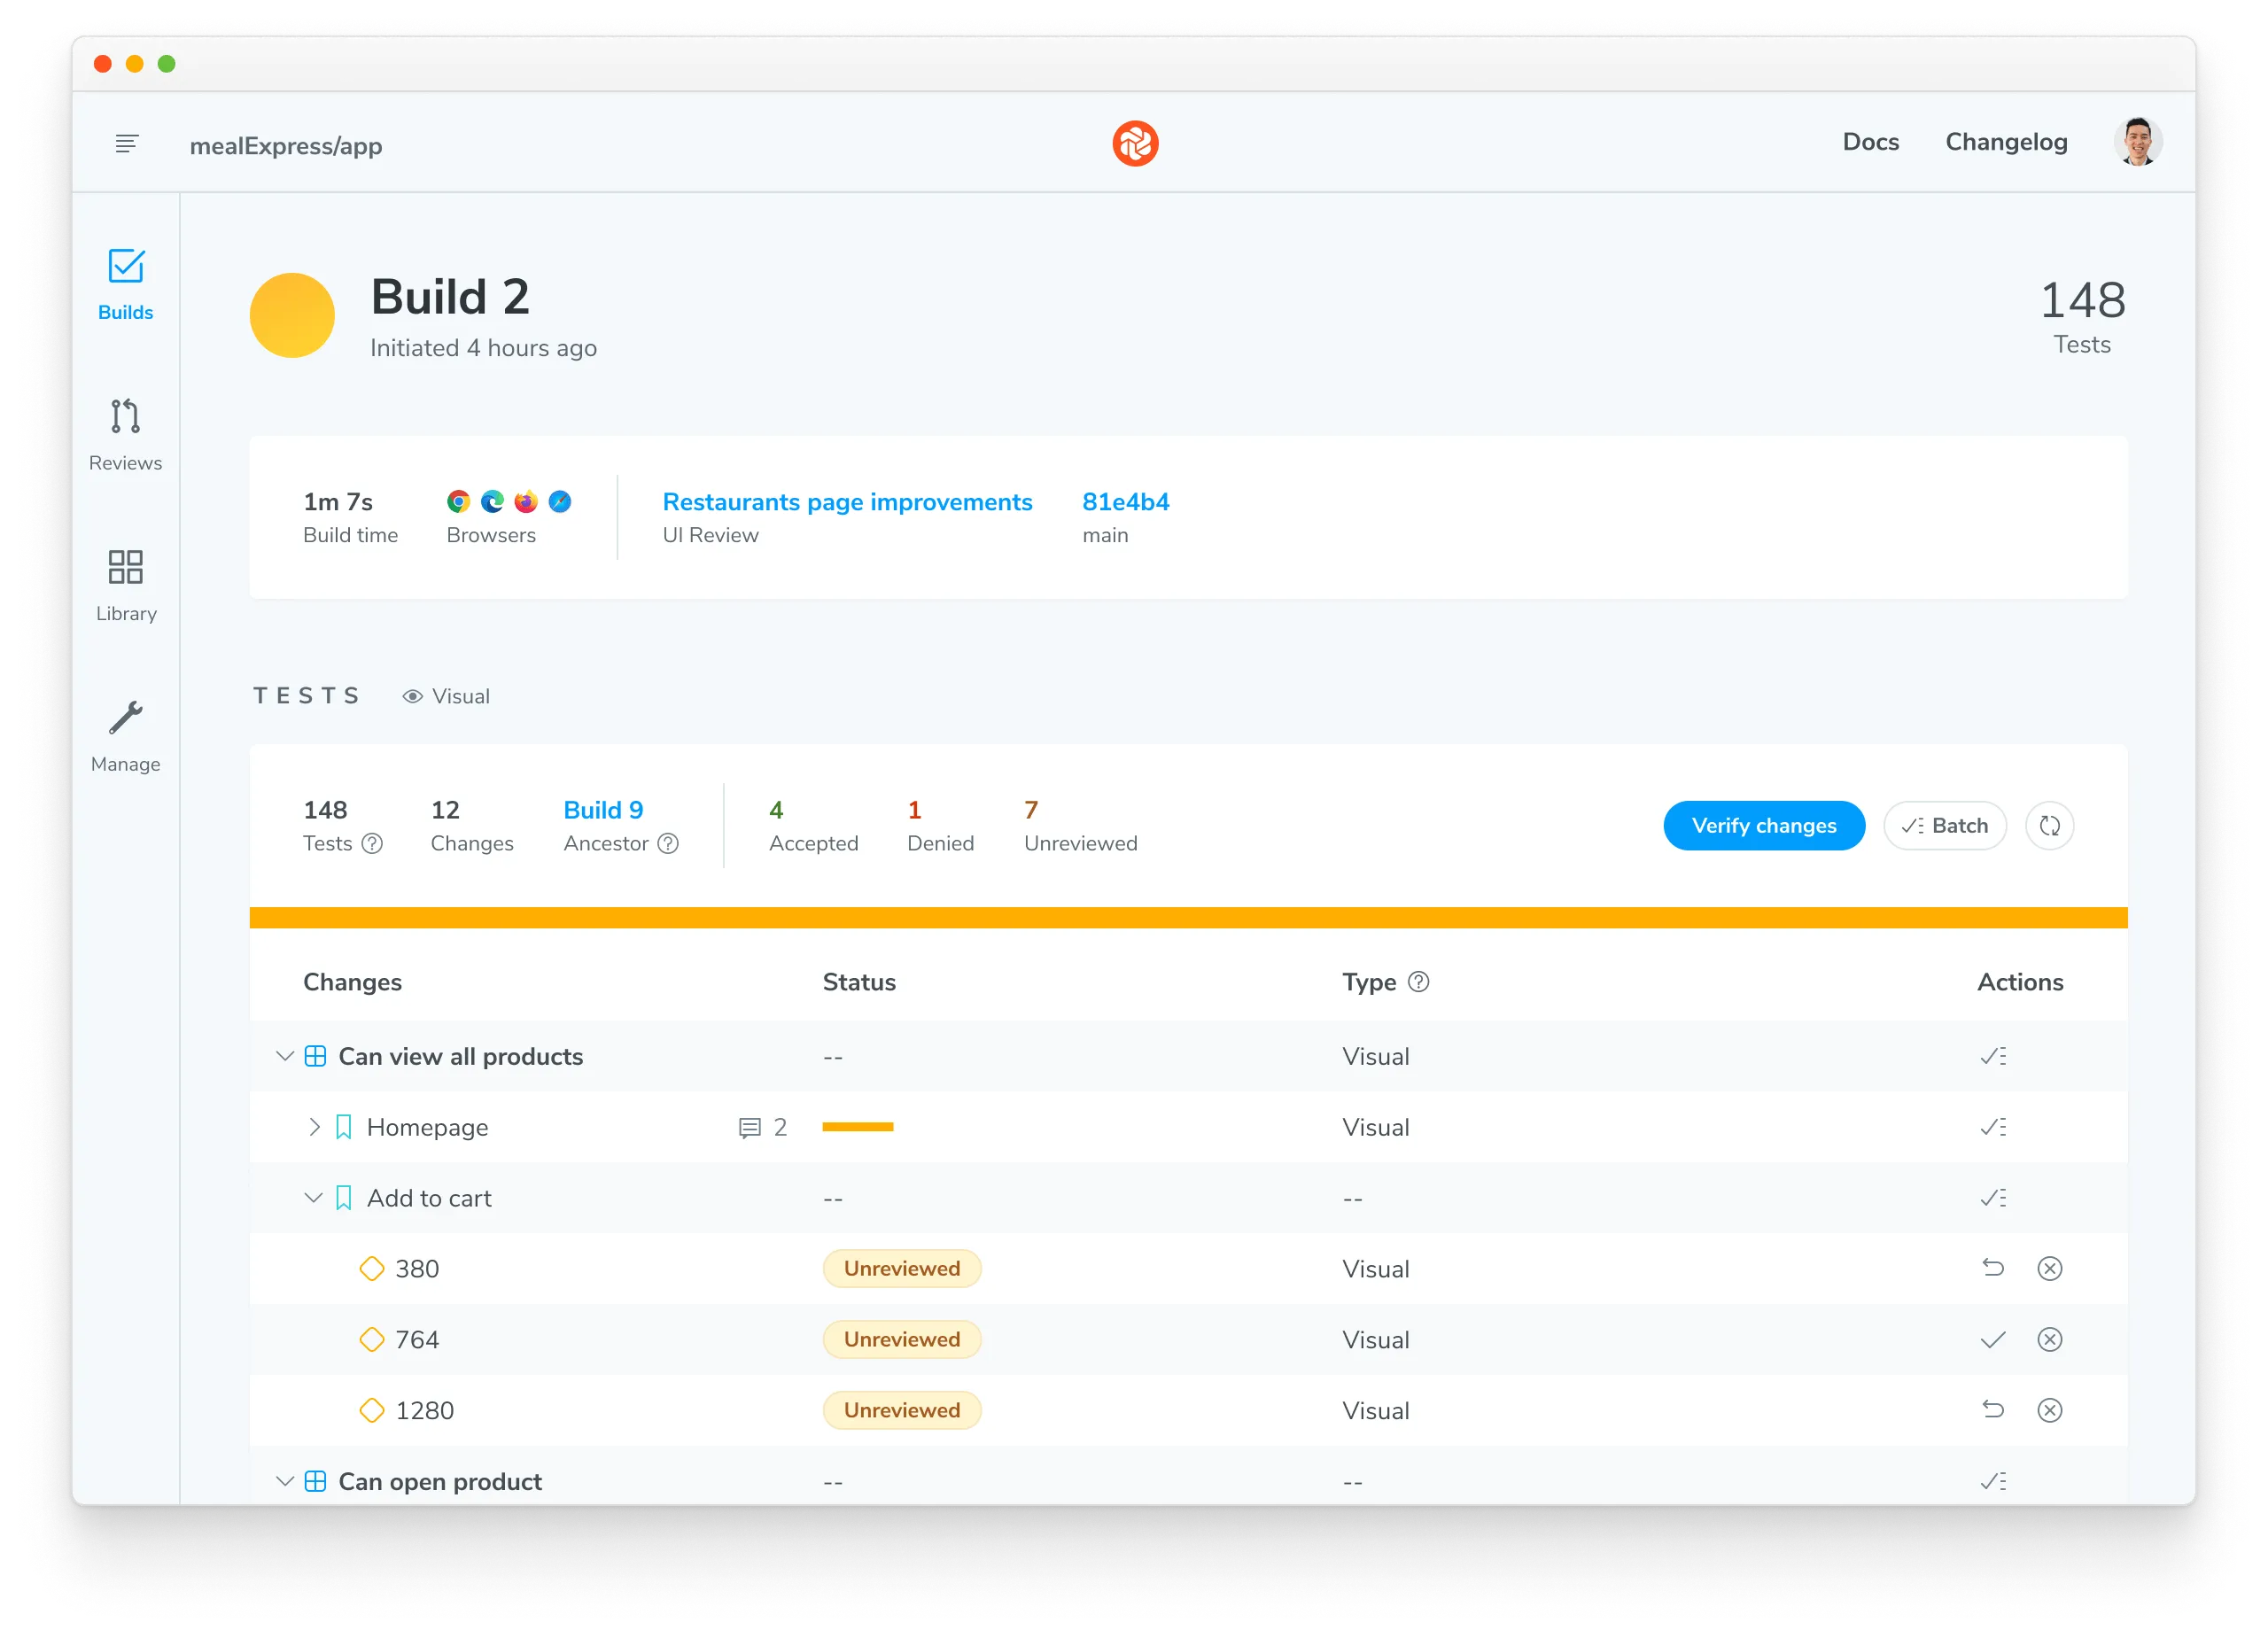
The build will be marked “unreviewed” and the changes will be listed in the “Tests” table. Go through each snapshot to review the diff and approve or reject the change.
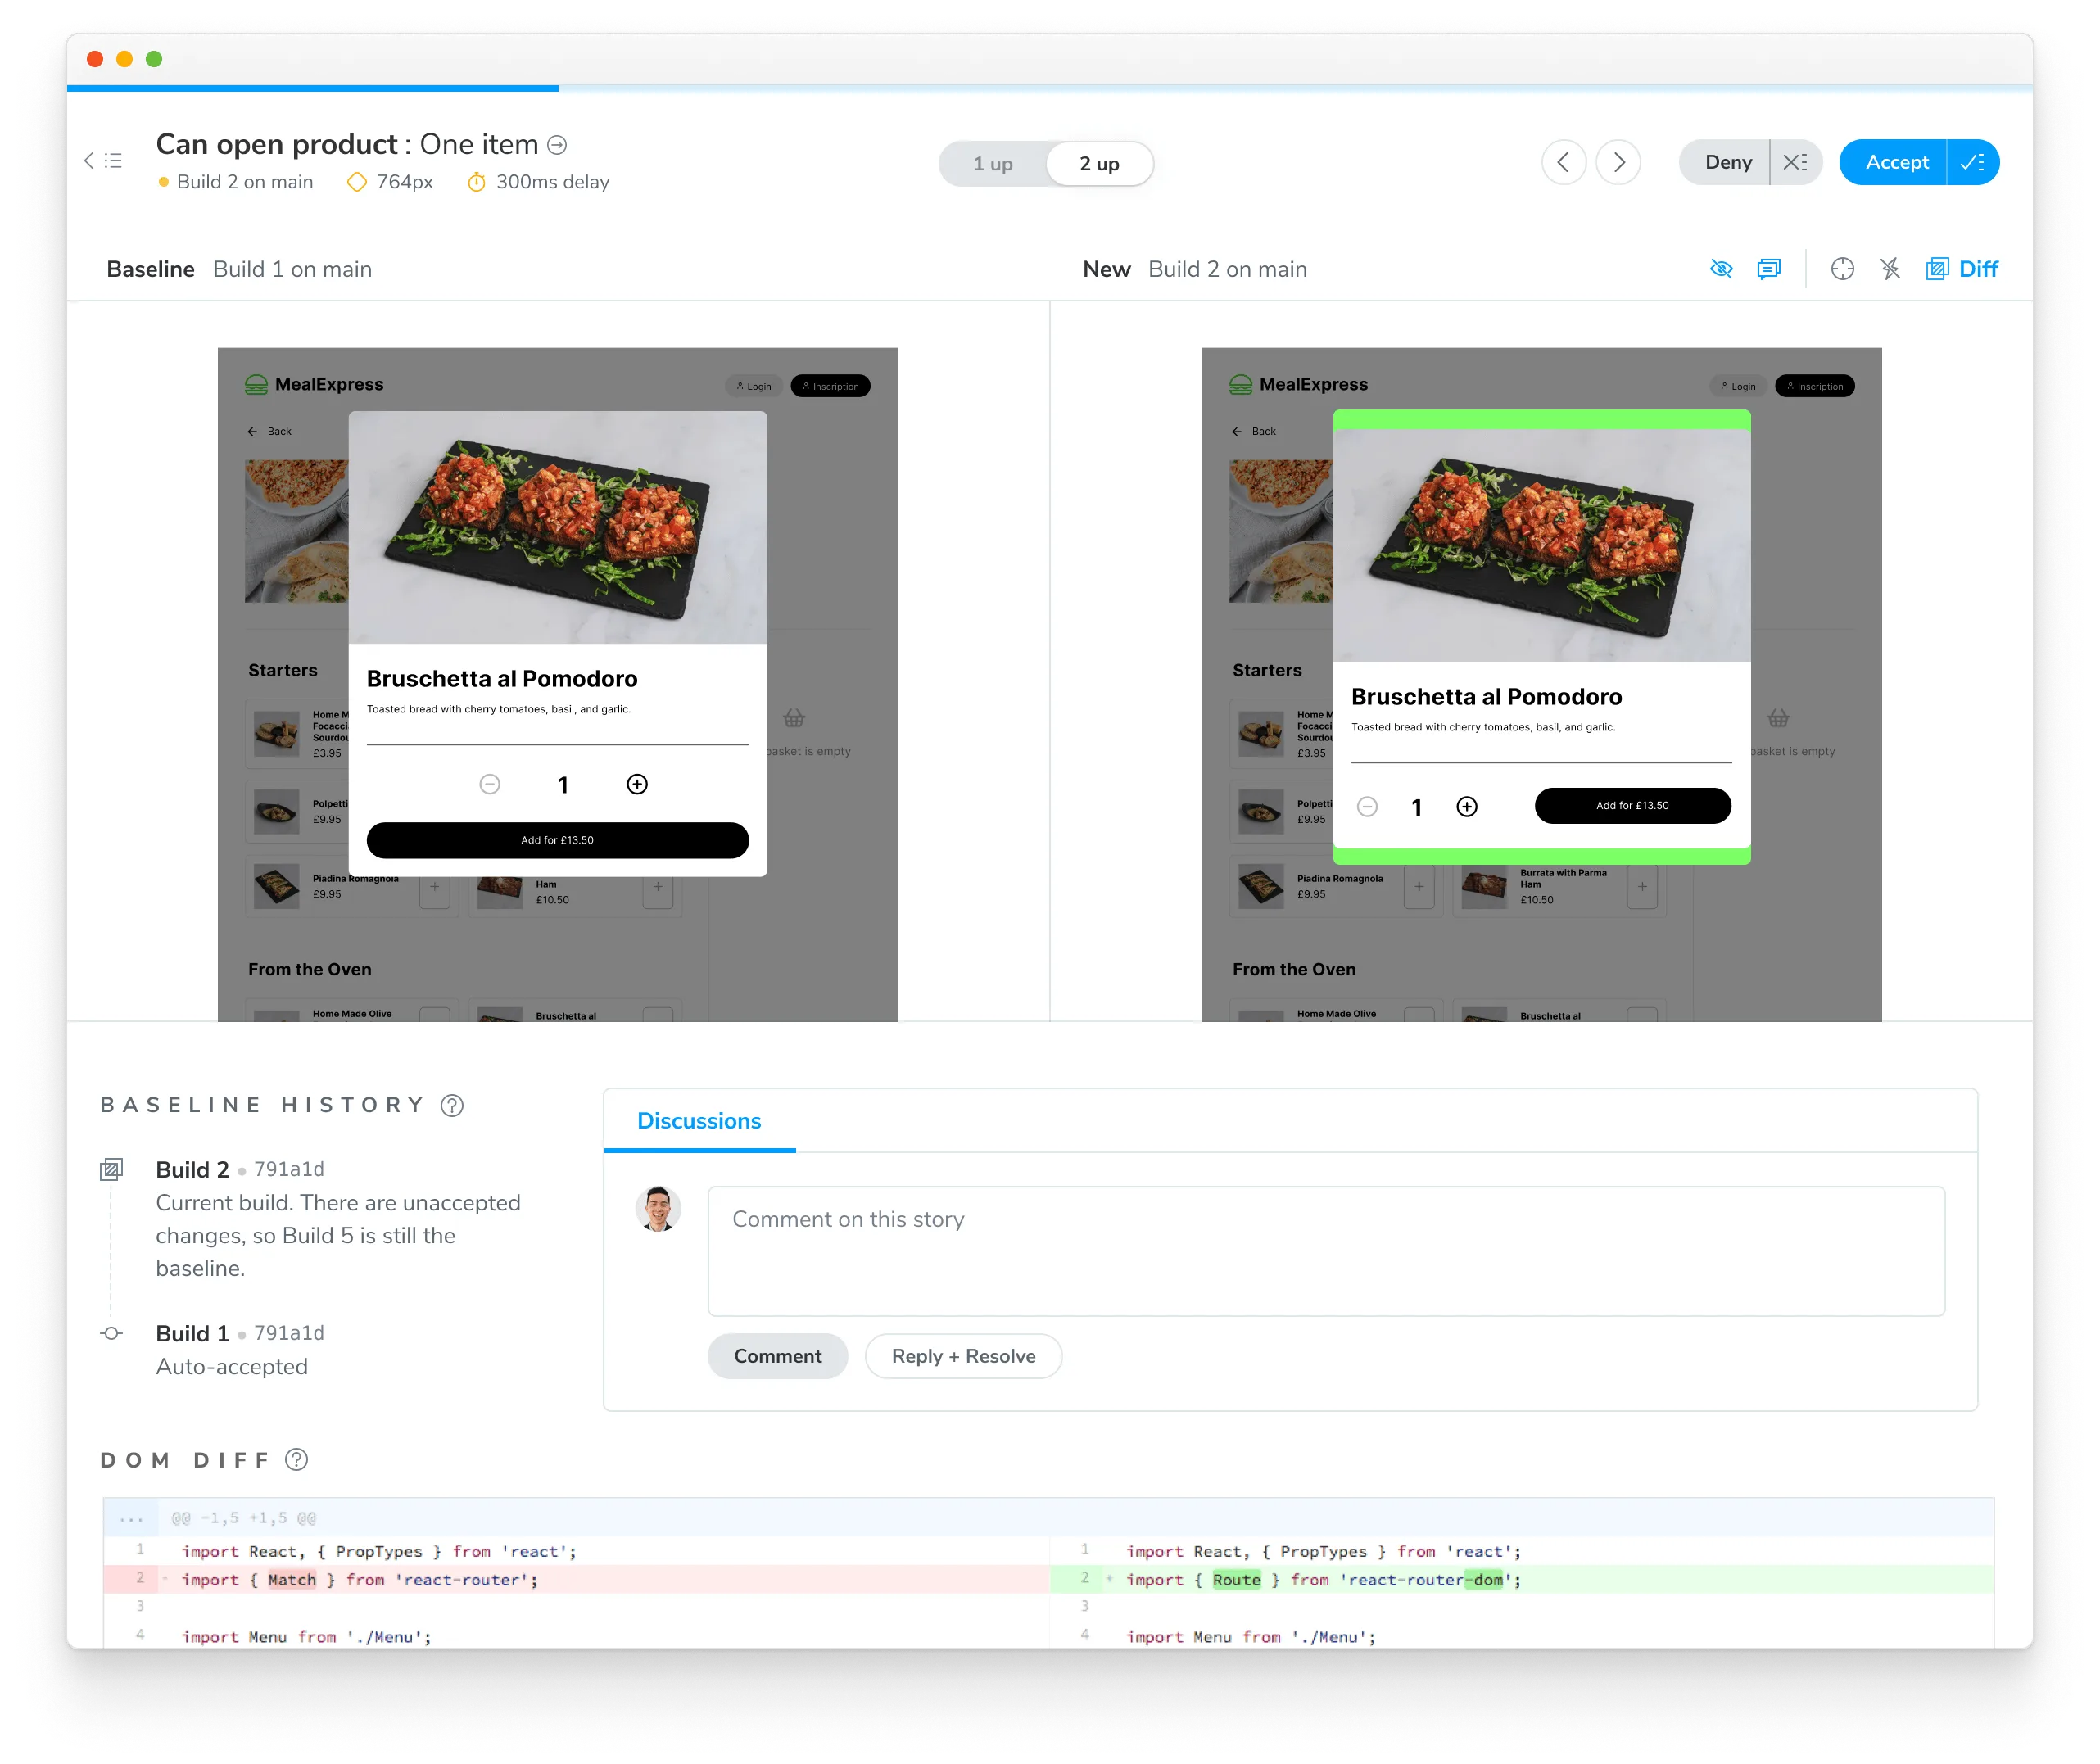
Once you accept all changes, your build is marked as passed 🟢. This updates the baselines for those tests, ensuring future snapshots are compared against the latest approved version.
Next: enhance your UI Testing workflow
You’re building robust components by uncovering bugs during development. Take your testing to the next level and safeguard against visual bugs by automating Chromatic whenever you push code.

Integrate Chromatic into your CI pipeline to get notified about any visual changes introduced by a pull request. Chromatic runs test any time you push code and reports changes via the “UI Tests” badge for your pull request.
Advanced configuration options
Take full control of your Chromatic and Playwright setup to match your team’s specific workflows. Here are some powerful customizations we offer:
- Take targeted snapshots: Learn how to programmatically capture snapshots at specific points during your tests.
- Fine-tune snapshot capture: Add delays before snapshots, modify the sensitivity threshold for change detection, and employ other granular controls.
- Test for flexible user preferences: Ensure your UI gracefully adapts to user preferences like
forced-colorsandprefers-reduced-motion. - Responsive testing: Verify your UI’s responsiveness across various screen sizes. Easily configure viewport dimensions in Playwright, both globally and within individual tests.
- Manage sharded Playwright runs: If your Playwright test suite is distributed across multiple CI jobs, learn how to coordinate their completion before running Chromatic.
Frequently asked questions
Command error git log -n 1
This error often appears when git is not available in your CI environment. Chromatic uses git to associate commits to pull/merge requests and set baselines. We require that an executable git is available (on the $PATH ) of the chromatic script.
Common cases:
- Docker containers: Git may not be installed on certain Docker containers. You’ll need to make the image includes Git.
- Heroku CI: Git history isn’t available by default. You’ll have to give Heroku auth access to your repo so that it can clone it before running CI. This can be unideal. Some customers end up using other CI providers to run Chromatic like GitHub Actions (free) or CircleCI.
- Google Cloud CI: The
.gitfolder is ignored by default. Based on their documentation you can try.gcloudignore. However, some customers have run into trouble with this solution and instead opted to use other CI providers to run Chromatic like GitHub Actions (free) or CircleCI. - You don’t use Git: Enable Git version control in your project and try Chromatic again.
Debug yourself:
- Try running the command manually
git log -n 1 --format="%H,%ct,%ce,%cn"and check if there are errors
Why do my builds timeout
Chromatic takes snapshots very quickly. However, if we lose the connection to your server (for instance if you stop your server mid-build, or your internet connection goes down), builds can time out. Check your connection and try restarting the build.
Why am I getting a ERR_INVALID_ARG_TYPE error?
If you’re encountering the following error in a Playwright/Cypress project:
TypeError [ERR_INVALID_ARG_TYPE]: The "paths[1]" argument must be of type string. Received undefined
  at Object.resolve (node:path:1222:7)
  at binPath (/Users/aaa/dev/temp/chromatic-e2e-examples/node_modules/@chromatic-com/playwright/dist/bin/build-archive-storybook.js:15:2773)
  at /Users/aaa/dev/temp/chromatic-e2e-examples/node_modules/@chromatic-com/playwright/dist/bin/build-archive-storybook.js:15:2630 {
code: 'ERR_INVALID_ARG_TYPE'
This issue likely due to a dependency conflict with Storybook versions in your project. You’ll have the following in your package.json:
"overrides": {
  "storybook": "$storybook"
}
This override force Chromatic to use an incompatible version of Storybook with Playwright/Chromatic, leading to errors. To resolve this, remove the Storybook overrides line from your package.json.
Can I use TurboSnap with Playwright visual tests?
No. Playwright is a “black box” tool that tests your fully built app UI in a browser. TurboSnap is incompatible with this testing methodology because it requires tracking code changes and git history to identify the UI that’s likely to change. We would love to integrate TurboSnap and Playwright but it isn’t technically feasible right now.
Why is there a Build your Storybook step when running Playwright visual tests?
Chromatic creates and runs a Storybook archive based on your Playwright project, so the build Storybook step is required. Chromatic doesn’t run Playwright directly.
Can I use custom fixtures with Playwright visual tests?
Chromatic’s Playwright integration is designed to work with third-party integrations and tools. It allows you to combine your existing fixtures via the mergeTests option. See our FAQ on BDD support with Playwright to learn more.
Is using Chrome mandatory when running Playwright with Chromatic?
Yes. Chromatic relies on Chrome for snapshotting, so Chrome must be included in your Playwright configuration.
Omitting it will trigger error: Failed to run chromatic -playwright
Refer to Playwright documentation: Run tests on different browsers